Tankless Water Heater Leaking — What to Do
Found water near your tankless? Step 1 shut-offs, leak source identification, water-damage prevention, and when leaks mean replacement not repair.
6 min read
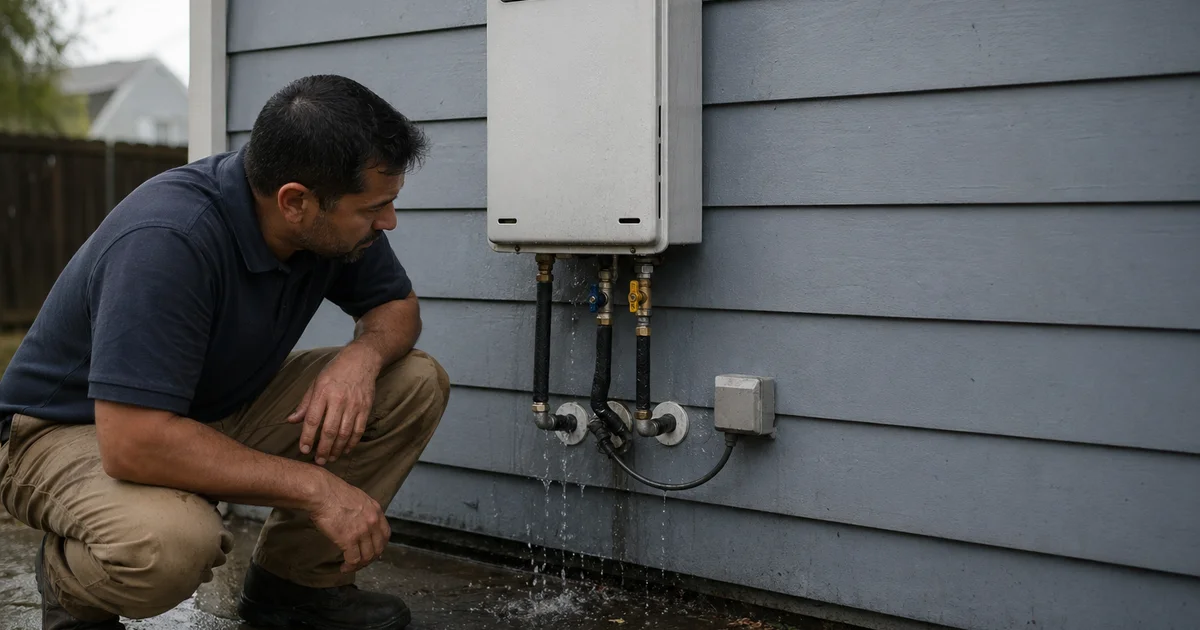
You know how a small puddle in the utility closet often feels like a minor nuisance. That moisture is actually a loud alarm bell. A tankless water heater leaking is rarely a wait-and-see situation.
We find that even minor drips point to failing internal seals or overwhelmed pressure valves. Continued use puts your drywall, flooring, and electrical systems at immediate risk.
Let’s walk through the exact steps to secure the unit right now and assess the damage safely.
Step 1: Shut Off Now
Stopping the active flow of water and gas is your only priority right now. We need to isolate the appliance before troubleshooting anything else.
In this specific order:
- Shut the gas valve at the unit (the handle should be perpendicular to the pipe to be closed).
- Shut the cold water inlet valve feeding the system (usually a colored ball valve located just below the unit).
- Shut the breaker for the tankless system at your main electrical panel.
- Open a hot tap at a nearby sink to relieve built-up internal pressure.
Modern units from brands like Rinnai and Navien require standard 120V electrical power to run the internal computer. We strongly advise killing that power at the breaker panel rather than just unplugging a wet cord. Water and active electrical currents create a serious hazard.
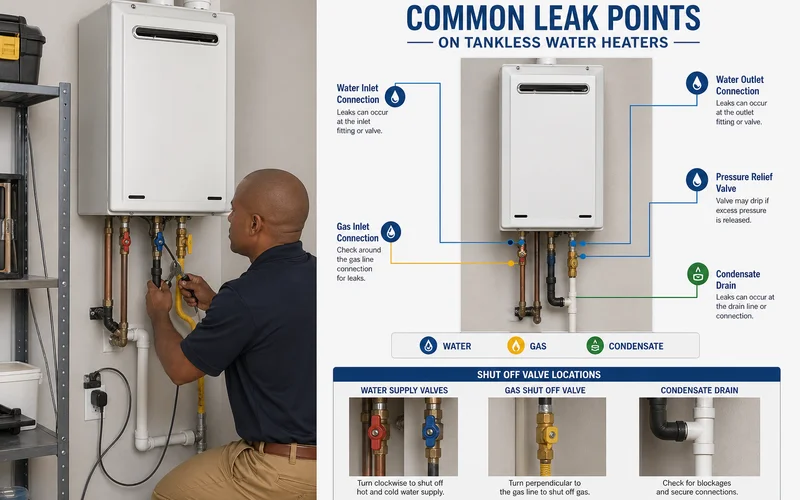
Step 2: Identify the Leak Source
Pinpointing the origin of the moisture tells the technician exactly what parts to bring. You can often spot the problem area just by looking at the casing.
We see hard water scale buildup as the leading cause of internal component failure across the US. This mineral accumulation creates pressure spikes that force water out of weak points.
Five common leak locations include:
| Source | What It Looks Like | Severity |
|---|---|---|
| Pressure relief valve (PRV) | Drip from a small copper or PVC pipe extending from the side or bottom | Often fixable, usually indicates a pressure spike or failing internal spring |
| Inlet/outlet fittings | Drip at threaded connections at the base or top of the unit | Usually a simple O-ring replacement or fresh PTFE tape, low cost |
| Internal heat exchanger crack | Steady leak pooling directly from the bottom of the metal cabinet | Major repair or full replacement required |
| Condensate drain line | Slow drip from condensate piping on high-efficiency condensing units | Usually minor, points to a clogged neutralizer or blocked tube |
| Gas valve assembly | Water pooling in or around the yellow gas connection area | Stop everything, evacuate the immediate area, and call urgently |
Take clear photos of the unit and the puddle before you start mopping. You will need these images for the plumbing diagnostic and any potential homeowner insurance claims.
Step 3: Contain the Damage
Protecting your surrounding floors and walls comes next. Water spreads incredibly fast under baseboards and into subflooring.
We review industry reports regularly, and 2026 data from Gitnux shows the average U.S. home water damage insurance payout sits around $17,000. Mold can begin colonizing wet drywall within just 24 to 48 hours.
While waiting for the technician to arrive:
- Place thick towels and a large bucket directly under the unit to catch ongoing drips.
- Move stored items and cardboard boxes away from the immediate area.
- Photograph any wall, floor, or cabinet damage that has already started.
- Open windows briefly if you detect even a faint smell of gas, then leave the area immediately and call for help from outside.
Acting quickly minimizes the restoration bill later.
Step 4: Call for Service
A licensed professional needs to open the cabinet and safely diagnose the internal failure. Gas appliances are not DIY repair projects.
For active issues, our tankless repair service prioritizes same-day dispatch. We know exactly how disruptive a broken system is for a household.
Tell the dispatcher these specific details:
- Is the leak currently active or completely stopped?
- What is the approximate leak rate (a slow drip versus a steady stream)?
- Where does the water appear to originate on the unit?
- Have you successfully shut off the gas, water, and electrical power?
- What is the unit’s brand (like Noritz or Rheem), exact model number, and approximate age?
Having this information allows the technician to pull the correct diagnostic manuals and load the truck with likely replacement parts. A standard diagnostic visit and minor repair in the US generally costs between $150 and $300.
When Leaks Mean Replacement, Not Repair
A severe crack inside the core often means that installing a brand new unit is the smartest financial move. Repairing major components on an aging system rarely offers a good return on investment.
We remind homeowners that the U.S. Department of Energy estimates a well-maintained tankless heater can last up to 20 years. Reaching that milestone depends heavily on consistent maintenance.
Three leak scenarios typically make replacement the right call:
- Heat exchanger crack on units past 10 years. A replacement heat exchanger part plus labor easily runs $600 to $1,300, which approaches the cost of a new unit without giving you a new warranty.
- Multiple simultaneous leak points. Finding water coming from several places indicates broader system degradation and metal fatigue.
- Heat exchanger crack with visible scale damage. Scale-induced cracks almost never heal properly. Replacing the exchanger leaves the underlying hard water problem entirely in place.
Reviewing the numbers helps you make an objective decision. For the broader math on this topic, see our repair vs replacement guide.
Common Leaks That Are Cheap Fixes
Many frightening drips actually come from highly accessible and inexpensive exterior parts. You do not always need a massive repair budget.
We resolve plenty of minor issues in under an hour. Simple worn seals are incredibly common on units that vibrate slightly during operation.
Two leak categories are usually fixable for under $300:
- Pressure relief valve drip. Plumbers often resolve this by replacing the failing valve itself ($50 to $100 for the part plus labor) or by addressing upstream home water pressure issues.
- Inlet/outlet fitting drip. This repair usually just requires a fresh O-ring or a quick redo with high-quality PTFE thread tape during a standard service call.
Either of these fixes is well worth performing on a system under 10 years old. Scheduling an annual $150 to $350 professional descaling flush prevents many of these cheap fixes from happening in the first place.
Insurance Documentation
Documenting the incident accurately protects your wallet if the structural damage is severe. Insurers require clear proof of the sudden failure.
Industry data shows that about 1 in 60 insured homes files a water damage claim every year. We strongly suggest building a paper trail immediately.
If the leak ruined baseboards or flooring:
- Photograph everything from multiple angles before starting any serious cleanup.
- Document the exact timeline. Write down when you first noticed the puddle and the exact minute you shut the valves off.
- Save the technician’s official diagnostic report. This paperwork proves the leak source and documents the specific component failure for the adjuster.
- File the claim within the insurer’s strict timeline. Most companies require formal notice within 30 to 60 days.
Standard policies from carriers like Allstate or State Farm typically cover sudden and accidental water damage. Getting coverage for slow, gradual leaks usually depends on whether you have clean maintenance documentation to prove you cared for the unit.
For rapid repair dispatch, our tankless repair service handles emergency leak calls 24/7.
Frequently Asked Questions
Can I keep using my tankless if it's leaking slightly?
Does homeowner insurance cover water damage from a tankless leak?
Is a leaking heat exchanger fixable?
Related Guides
Cold Water Sandwich Problem in Tankless Water Heaters
What causes the 'cold water sandwich' tankless quirk — and why it's normal, not a defect. Recirculation pumps and mini-tank buffers that solve it.
Common Tankless Water Heater Problems and Signs You Need Repair
Mid-shower shutdowns, weird noises, low pressure, scaling — when each tankless symptom is a quick fix vs serious repair. Urgency level for each.
DIY vs Professional Tankless Repair (What's Safe to Tackle)
Filter cleaning and basic resets are DIY-friendly. Gas, combustion, and heat exchanger work require a licensed plumber — and DIY voids most warranties.
Tankless Water Heater Repair vs Replacement (Decision Guide)
When to fix vs replace a tankless: the 50% rule, age threshold, failure modes that always mean replacement. Honest decision framework with examples.